My Dollhouse Project
I thought I'd do something a little different for this post, the first one in about a month! I talked a lot on Twitter about this project when I was working on it, and it would be good to get it all collected in one place.
I have no idea what first gave me the idea to do a dollhouse refurbishment. I can't remember if I came across the supplies online and that sparked the idea, or if something else put it in my mind and I went looking. But in the summer of 2022 I was really struggling with my mental health. One thing that's helped in the past is throwing myself into a new project, and this one had been brewing in the back of my mind for a little while. I decided it was time to do it! The dollhouse in question is at my mum's house, and it just so happened that I'd be staying there for a few weeks while she was away, giving me the perfect opportunity to work on it and surprise her with the outcome.
The dollhouse was originally made by my grandad for my younger sister about 35 years ago. As far as I know, it's the only one he ever made, but he was a man who was very clever at making things and putting things together. For most of our childhood it was home to a selection of Sylvanian Families, and I don't really know where it went when she outgrew it.
Wherever it was, my mum retrieved it a few years ago and decided it would be good for my niece to play with when she visited the north east. Because it was definitely showing its age, she gave all the walls, inside and outside, a few coats of white vinyl emulsion, and painted the roof with a red gloss. Over the white painted floors she stuck down some blue felt sheets that really didn't fit properly. I guess it served its purpose, covering up the damage of several decades, and was a lot better than peeling paper on the walls and roof. It just didn't look very good. Also, half of the windows were missing in their frames. Every time I saw it, I thought it needed some work done in it.

 |
| The dollhouse before I started work on it. |
I started working on it on June 23rd. The first step was to get the felt out and sand off the residue it left behind. Underneath it I could see the nice wooden floorboard of the original design. Further work would reveal the original rooftiles on the underside of the roof and the brickwork that had survived on the underside of the dollhouse.
 |
| The original floorboards underneath emulsion and felt. |
I measured all of the rooms as best I could, and picked out a range of papers to use for the walls and floors. Everything I ordered came from a website called Minimum World that I definitely recommend. Their prices vary considerably based on what you're ordering, but I found a very affordable selection and great service.
 |
| The first set of papers I ordered. |
I got quite a selection. The carpet pieces are a soft felt with an adhesive already applied. They were easy enough to cut to size and then I just peeled off the backing paper and placed them in the upstairs rooms as carefully as possible. I ended up with a couple of ripples, but it smoothed down fairly well. The wallpaper and flooring were just paper sheets, so I had to measure and cut them, and then apply copious amounts of PVA glue to them before sticking them down. Again, there were inevitably air bubble issues, particularly with the wood flooring which was thinner than the wallpaper. The thicker paper of the wallpaper went on more easily and gave a neater finish altogether. Measuring it was really quite fiddly, as nothing was exactly even and it was awkward getting into corners, but using a pencil and a sharp knife it wasn't long before I had the first room finished!
 |
| My co-decorator inspecting the first room I finished |
The gold wallpaper is a pretty good match for my mum's bedroom, which I was quite pleased with. The second room was deliberately aimed more at my niece, and came along well.
 |
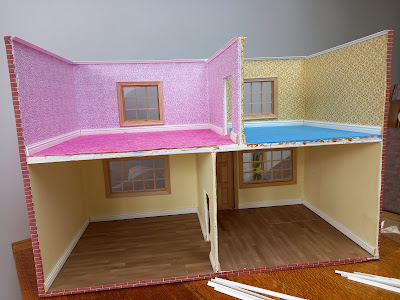
| The upstairs is finished. |
It was when I reached this point that I could really appreciate that this was going to look really nice. There was still a lot of work to go, but with the upstairs finished I was really happy with my progress.
The downstairs was a little more difficult, with more obstacles to cut around and the thinner paper of the wood flooring being harder to get down smoothly. It tore in one place, and I had to patch it up with an offcut, which you can make out in the back right corner here. But getting the inside finished gave me a real sense of achievement.
 |
| The inside, complete. |
The next day I set to work on the outside of the dollhouse. This was June 24th. The first step was to lever off the doorframe and all of the window frames. I had originally intended to keep the original windows and doors, but as I got a proper look at them I realised how many of the windows were actually missing, and that they would all need to be replaced. This was the first time the project scope grew. It wasn't the last!
 |
| You can see some of the original brick and wallpaper here. |
The brickwork came in really big sheets of fairly thick paper. I had to measure, cut and cover it in PVA before trying to put it on as carefully as possible. Then I had to do my best to smooth out and bubbles. It left a few ripples and lines. I'm really not sure how to avoid them when you're working with such large sheets like that, but it went on and I was very happy with the final results. I left small overlaps to cover the window frames and door frames, because I had no idea what would be happening to them later!
I now had the building part of the dollhouse fully covered, inside and out. The brick sheets brought it back closer to my grandad's original vision and was a huge improvement over splashed on emulsion. Stage one of the refurbishment was complete!
I came back to the project on 1st August. The roof was the next big piece of work. It had been given a red gloss coat, but was already peeling quite badly. There was a broken plastic chimney pot that had to come off too. I cut that off, and filled in the remaining hole with polyfilla.
 |
| The underside shows the original roof tiling. |
I covered the chimney in the same brick paper I had from the house walls. I also ordered a new chimney pot, a lovely ceramic piece that I superglued in place once the brickwork was done. I peeled off enough of the red paint to give me a smooth base, and then stuck some rooftile paper on. Like the brickwork this came in long sheets and was easy to measure and cut (apart from around the chimney) though again it was hard getting a smooth finish.
 |
| a work-in-progress shot. Those air-bubbles were my bane! |
While doing the easier of the narrow edges, I messed up and stuck the tiles on upside down. This was despite being sure I'd checked at least twice. It came off easily enough, but I didn't have enough paper to finish it off so had to order more. Around the chimney I ended up working on small sections, with one piece going up to the base of the chimney and another on top. Matching it all up perfectly might have been possible, but even without that it left a satisfactory result. Within the week the new sheet had arrived (with some more accessories I ordered), and I was able to finish off the roof and add the chimney pot.
 |
| Everything drying on a nearby chest |
That was everything I'd planned to do, done. But it didn't feel finished yet. Those windows and the door had come off, and needed replacing. The problem was, it was impossible to get replacements the same size. Although it looked quite large, this dollhouse was actually quite small compared to the scale of the items I was looking at. The most common scale seems to be 1:12. I found some nice doors and windows that would fit, but only if I enlarged the openings. So I had to figure out how to do that.
The answer was a Dremel with a circular wood-cutting saw. Luckily I happen to have a Dremel that I hardly ever use, so I ordered a circular saw blade for it, and a bunch of window frames and doors.
 |
| I went for a Georgian style. |
What followed was very noisy and very dusty! It was also incredibly satisfying! But I managed to cut out larger openings for each window and for the door. I also ordered acetate sheets that would just fit neatly into the frames, making actual windows.
 |
| Those windows had to get a lot bigger! |
With a little trimming, I finally had four windows and a new door in. They were a lot bigger than the originals, without looking too large for the dollhouse. The door was the most problematic, as the only way I could fit it into the room the original door had been in was by having it very close to the window, and it ended up raised slightly due to the base sheet of the doll house.
I left everything to dry, swept up the vast quantities of sawdust, and that was the end of that day's work.
After a short trip to London for a launch party or two, I was back at it on 6th August. There really wasn't much left to do at this point.
That gap below the front door was an easy problem to solve. All I needed was a doorstep. I found a nice ceramic one the perfect height, and ordered a doormat along with it. Some superglue fixed this in place really well. I had been planning on pinning it too, but it really didn't need it. It's stayed on really well.
Those windows have an inside element, little strips of wood that glue on around the window on the inside of the house to complete it and leave everything looking very neat, so they went on next.

While I was working on the inside rooms, I encountered a problem that was probably minor enough to ignore, but bugged me. Due to the awkwardness of measuring and cutting in the small rooms, there were small gaps where the wallpaper and the flooring didn't quite meet up neatly. I decided that what it really needed was some skirting boards, just to neaten up that gap. Some moulding around the top would do the same thing for where the cut edges were looking a little ragged. The downstairs ceilings had been covered in embossed white wallpaper and that was looking alright but the upstairs needed the moulding. You can see in the picture just above how the brick on the outside overlaps slightly with the inside wallpaper. The moulding came in strips of white wood and was easily cut to length and glued in place with some PVA. A tiny mitre box would have been useful, but I did the best I could trimming angles in by eye.
 |
| The moulding does a great job covering up issues! |
It was at this point that I finished off the roof too.
And my dollhouse was complete, inside and out. It looked lovely, and I was really pleased with the final product. I'd gone into this project without the first clue what I was doing, learned a lot from my mistakes and finished with something I was proud of, and proud to present to my niece and sister.
.jpg) |
| The finished inside |
.jpg) |
| The finished outside. |
My mum sat with my niece in London and between them they selected a load of furniture to go in it. We had a main bedroom, a kids' bedroom, a kitchen, a living room and a bathroom. Oh! But we only have four rooms!
Yeah, maybe I wasn't quite as finished as I thought!
What this dollhouse needed was an extension into the attic!
Also, it was getting close to my niece's birthday by this point, and she was heading up to Newcastle shortly after it, so we decided it was going to be her birthday present. My ex-wife and kids got involved and ordered a few bits and pieces to go into it for her birthday.
The 12th August, the "completed" dollhouse, some accessory packs, a sheet of MDF board, a jigsaw borrowed from my dad and the ever present PVA glue.
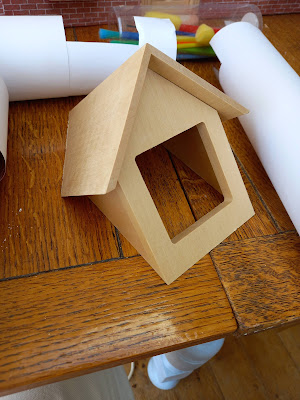
The additions from my kids went on first, because they were nice and easy. A couple of flower boxes were glued under the downstairs window and I added a bird box.
 |
| I love these little touches! |
The MDF board was cut to size, and covered with a bathroom tile paper. As I couldn't get anything big enough to cover the whole thing it was done in two pieces. After some discussion, it was then nailed into place on top of the house.

It's not ideal, and at some point I'll probably try to add some walls there too, but there's now an extra floor in the roof where the bathroom items can go.
I also really wanted to add this:
 |
| Obviously that bathroom needs some light |
I papered the roof of this to match the rest of the roof and the walls to match the rest of the walls. I glued a sheet of acrylic left over from the other windows into it to make a fairly basic window. Then I just glued it to the roof. At some point I really want to get the Dremel out again and cut a hole behind it in the roof so you can actually see through it, I just haven't gotten around to it yet.
So there are a couple of outstanding issues I might eventually get to, but on 13th August, almost two months after I started this project, I handed over the keys to the house to my 5 year old niece, who absolutely loves it!
So that's my dollhouse refurbishment project. I learned a lot doing it. I wish I'd known going into it everything I was going to do. Things like cutting the window and door holes would have been much better done before I papered inside and out. But generally it worked well, and there were always things I could do to cover up any mistakes. Minimum World were a great supplier, and all of my orders came quickly and securely packaged. I'd definitely use them again.
The final dollhouse is, in some ways, a lot closer to my grandad's original. The style and material has a similar look. But I've taken it beyond his creation, probably mostly thanks to much easier access to better quality supplies. I'm definitely not as neat or careful as he was though. In many ways it would have been so much easier starting with a complete blank slate, just making a new dollhouse. The sizes of "his dollhouse" didn't always work out great for mine, and that was something I was stuck with. I tried to fit internal doors at one point, but they were just too large and wouldn't fit into the rooms at all. But that's all balanced by the fact that it is a continuation of something he built, that this dollhouse is the result of his work, 35 years ago in his shed, and my work this summer. I love that aspect of it and wouldn't want to lose that history just to get a higher clearance. This is my sister's dollhouse and it is my niece's, and it has its own history now. It's something I'm very proud to have worked on, and it helped me at a time when I needed somewhere to go to get out of my own head.
.jpg)


.jpg)
.jpg)


.png)

Comments
Post a Comment